Beyond Straight Edges — The Curvy Side of SVG
After creating my first vector design of a paper bag, which was mostly straight edges, I decided for my next Inkscape project to create a canvas bag, which would be a bit more complex due to curves on the handles and the wrinkled sides of the bag. I found a suitable canvas bag image to use as a model and got to work.
I chose to make each differently shaded or colored section of the bag a separate vector object so that I could use a simple gradient on each object to color it. I drew all of the objects with the Bezier Curve tool (1), which allows you to place control points by left-clicking at strategic spots (2). These control points have handles that can be extended, retracted, and rotated to adjust how the curves look. There are four different types of points: a diamond-shaped point whose handles can be moved completely independently; a square-shaped point whose handles always make a straight line, but each handle can be a different length; a square-shaped point whose handles always make a straight line, but the handles are always the same length and moving one handle automatically moves the other one; and a circle-shaped point, which I have never used, but, based on observation, its purpose seems to be to do a quick smoothing of its part of the curve. Touching either of the handles on a circle-shaped control point turns it into the first type of square-shaped control point. For any given point, you can cycle among the different point types by doing a Ctrl+Left-click on the point.
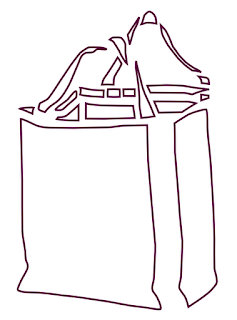
Here's a picture of all the objects that I drew:
And here's an exploded version so you can see each object:
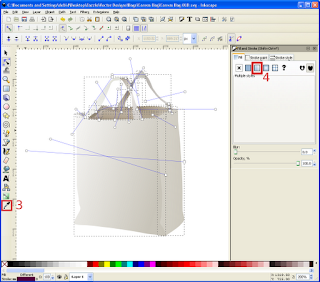
For each vector object, I used the Color Picker tool (3) to pick an appropriate color from the corresponding section of the original bag image and then chose a linear gradient (4) which went from 100% opacity at one end to 0% opacity at the other, adjusting the direction and length of each gradient line as necessary.
Of course, as pointed out in my previous post, setting the opacity below 100% meant that any colored background that this bag was placed on would show through the bag, but these initial steps allowed me to get my vector bag looking approximately how I wanted it.
After creating the canvas bag I had the idea of making a green version to imply the concept of "going green" by using a reusable bag. To make it easy to do the shading in green, I overlaid the original canvas bag image with a semi-transparent green square to that I could see how the shading went. Then I made a copy of my vector bag, used the color picker again to pick the appropriate shade of green for each part, and then used a linear gradient in each part to shade it.
After creating the canvas bag I had the idea of making a green version to imply the concept of "going green" by using a reusable bag. To make it easy to do the shading in green, I overlaid the original canvas bag image with a semi-transparent green square to that I could see how the shading went. Then I made a copy of my vector bag, used the color picker again to pick the appropriate shade of green for each part, and then used a linear gradient in each part to shade it.
I still had the linear gradients going to 0% opacity, so it was possible for background colors and objects to show through; plus, if you look closely, you can see that the seams between the vector objects that make up the bag are visible. This is an artifact of butting vector objects up against each other without overlapping enough. I wanted to fix these problems and also play around with the shading a bit, so I made a backup copy of my file and then started tweaking.
For some of the gradients I kept just the two endpoints, but made both of them 100% opacity and adjusted the lightness or darkness of the endpoints to get the shading I wanted. For other gradients, in addition to making the endpoints 100% opacity, I also added intermediate points in order to get a more interesting effect. This can be done by selecting a vector object with the Edit paths by node tool (5), opening the Fill and Stroke panel (6), selecting the Fill tab (7), clicking on the Edit button (8), then clicking on the Add stop button in the Gradient editor window (9) that pops open. After adding all the points I wanted, I selected each point on the gradient line and adjusted the color using the color tabs inside the Fill tab.
To get around the problem with seam lines showing between vector objects, I resized many of them slightly so that adjacent objects overlapped enough that the seam effect no longer occurred.
Once I had the white bag set up the way I liked, I copied it and made a green version the same way.
Once I had the white bag set up the way I liked, I copied it and made a green version the same way.
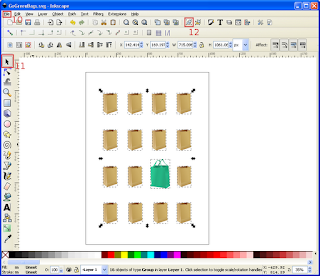
To complete the concept of "going green", I created a design with my new vector paper and canvas bags. I invoked a new instance of Inkscape and used the menu option File > Document Properties (10) to set the page dimensions to 1000 x 1400 pixels. I invoked a second Inkscape on my vector paper bag, selected all of its parts using the Select and transform objects tool (11), used the Group selected objects tool (12) to convert the paper bag to a single object for easy moving and resizing, then used Control-C to copy it and Control-V to paste a copy into my new empty document. I repeated the same steps for my vector canvas bag. Then I created 15 copies of the paper bag and made a 4 x 4 grid out of them with the green canvas bag placed among them. I used View > Grid to help me line up all the objects. I also have a 6" semi-transparent flexible plastic ruler that I can hold against my monitor to help me get spacing even.
Here's the final result:
This little bag project was simple, fun, and gave me the opportunity to learn not only how to use some of Inkscape's tools, but also how to deal with some of the types of problems that can crop up when working with scalable vector graphics.
A Newbie Adventure into Scalable Vector Graphics
How to Create a Vector Clown Fish with Inkscape
Related Articles
A Newbie Adventure into Scalable Vector Graphics
How to Create a Vector Clown Fish with Inkscape


ok tanks
ReplyDelete