A Gimp 2.8 Tutorial
This novice-level tutorial describes how to create this pinwheel pattern.
from this vane-like image of a wing that was cut from a photo of a Mallard duck.
Step 1 - Create a Canvas
First, you need a square workspace large enough to contain the full pinwheel. The width and height should be at least twice the width of the vane image, but you can add a few pixels for a comfort zone. The width of the vane in pixels can be determined either by loading the vane image into GIMP or by checking the file properties.
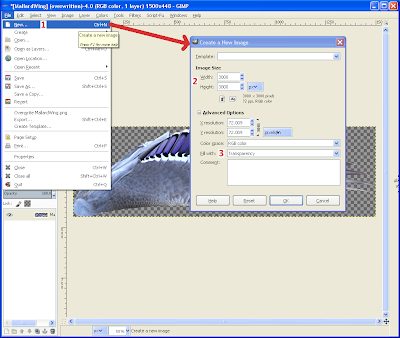
Start GIMP and create the square canvas by selecting File > New [1] and entering the appropriate width and height [2]. Fill the canvas with Transparency [3].
Step 2 - Insert the First Vane
Next, you want to add the base vane image to the canvas in such a way that it can be duplicated easily.
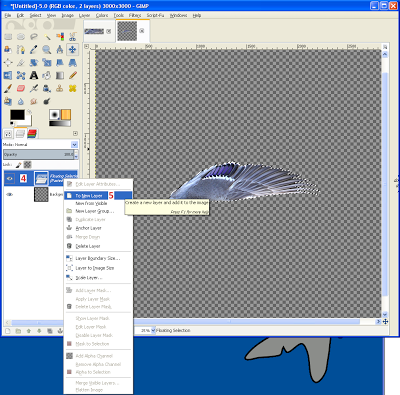
Load the vane image into GIMP and copy it using CTRL+C. Select the canvas image and paste the vane using CTRL+V. Make the vane a new layer by right-clicking on the Floating Selection (Pasted Layer) [4] in the Layers dialog and choosing To New Layer [5]. Rename the new layer "base" by double-clicking on the layer name and typing in a new one.
Step 3 - Find the Image Center
Now you need to find the center of the canvas so that the base vane can be properly aligned. You can use guides to do this.
Select Image > Guides > New Guide (by Percent) [6]. In the dialog that pops up, choose a Direction of Horizontal and a Position (in %) of 50 [7] and press the OK button. Repeat these steps, this time choosing Vertical for the direction. You should see a blue crosshair superimposed over the canvas.
Step 4 - Align and Anchor the First Vane
In order to create properly rotated copies of the base vane, it must be aligned against the center of the image, then anchored to a full-sized layer.
Using the Move Tool, grab the base vane image and drag it so that the part of the image that you want to be at the center is just touching the center of the crosshair [8]. Zoom in using CTRL+Mouse Wheel Forward to make this easier. Once you have the vane where you want it, check the other end of it to make sure it's within the canvas.
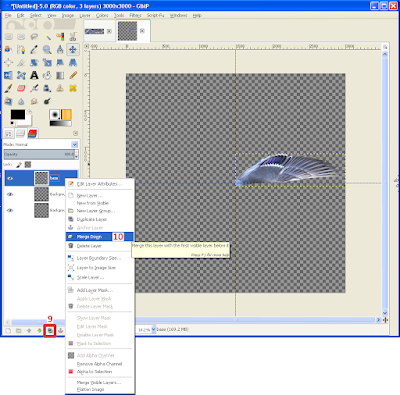
Duplicate the Background layer by selecting it and clicking on the doubled image icon [9] at the bottom of the Layers dialog. Then right-click on the base layer and choose Merge Down [10]. Rename this layer "base".
Step 5 - Create Each Vane in the Pinwheel
Before you start creating the rest of the vanes, decide how many of them you want in your pinwheel, then divide that number into 360 (the number of degrees in a circle) to get the number of degrees for each rotation.
To create the next vane layer, you need to duplicate a previous layer, then rotate the copy.
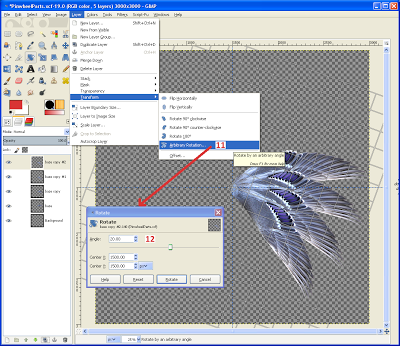
Duplicate a vane layer, then, with the copy layer activated, select Layer > Transform > Arbitrary Rotation [11], enter your calculated degrees in the Angle field [12], and press the Rotate button.
Repeat this step for each vane, choosing the previously created vane to duplicate, until you have completed the full circle.
NOTE:
Because of the way GIMP does rotations, each time a layer is rotated, it gets larger. You can use one of the following methods to minimize the size of each vane layer.
- After creating a few vane layers, use the Rectangle Select Tool to draw a selection region just around the outside of the canvas, then choose Image > Crop to Selection to crop all layers.
- Alternatively, always duplicate the base layer and adjust the number of degrees of rotation by a multiple of the base degrees of rotation. For example, for the third layer copy, enter 3 times the number of degrees in the Angle field. Using this method will require you to move the duplicated layer to the top of the Layers list.
Step 6 - Fix the Overlap
When you're finished adding all vanes, you'll see that the last vane is above the first vane when it should be under it. In fact, it's probably on top of several vanes. In order to fix this, you'll need to delete part of it to make it look like it's underneath.
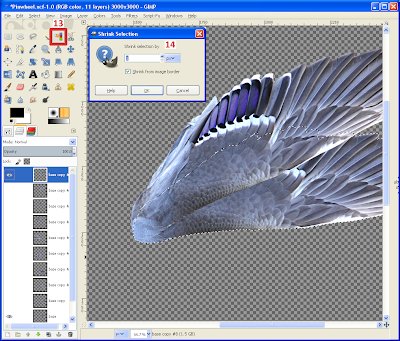
Hide all but the first and last vanes by clicking the eye icon on each layer. Select the first (base) vane layer, then select the Select by Color Tool [13]. Left-click in the transparent background, then do CTRL+I to invert the selection to select the vane.
To avoid leaving a thin semi-transparent line along the edge of the cut, choose Select > Shrink. In the Shrink Selection dialog [14], enter 1 pixel, make sure Shrink from image border is selected, and hit OK. Select the last vane layer, then hit the Delete key.
Make the second-to-last vane layer visible and notice that it also has an overlap problem. Select the second-to-last layer and hit the Delete key. Repeat this process for a few layers until you see that there is no longer any overlap, then make all layers visible and do one final check to make sure the pattern looks OK.
Use CTRL+SHIFT+A to remove the selection.
You may notice that the first vane layer appears to have a hard transition along the edge next to the last vane layer. One method for softening this transition is to merge the last few layers into one composite layer, then select the Eraser Tool and choose a soft brush (hardness 25 or 50). With the composite layer selected, carefully move or click the eraser along the hard edge to feather it. Try not to affect more than one or two pixels from the edge.
When you're happy with your pinwheel, you can merge all vane layers into one layer to reduce the file size. Do this either by right-clicking on each layer and choosing Merge Down or by selecting Image > Merge Visible Layers, choosing Clipped to bottom layer, and pushing the Merge button.
Use File > Export to save your pinwheel as a raster file.
Conclusion
In this tutorial, you learned how to create a canvas; use guides to find the center of an image; create, duplicate, and rotate layers; create and modify selection areas; and feather an image using an eraser. You can now enjoy creating simple to complex pinwheel patterns using any shape you desire. Your imagination is the limit.




No comments:
Post a Comment