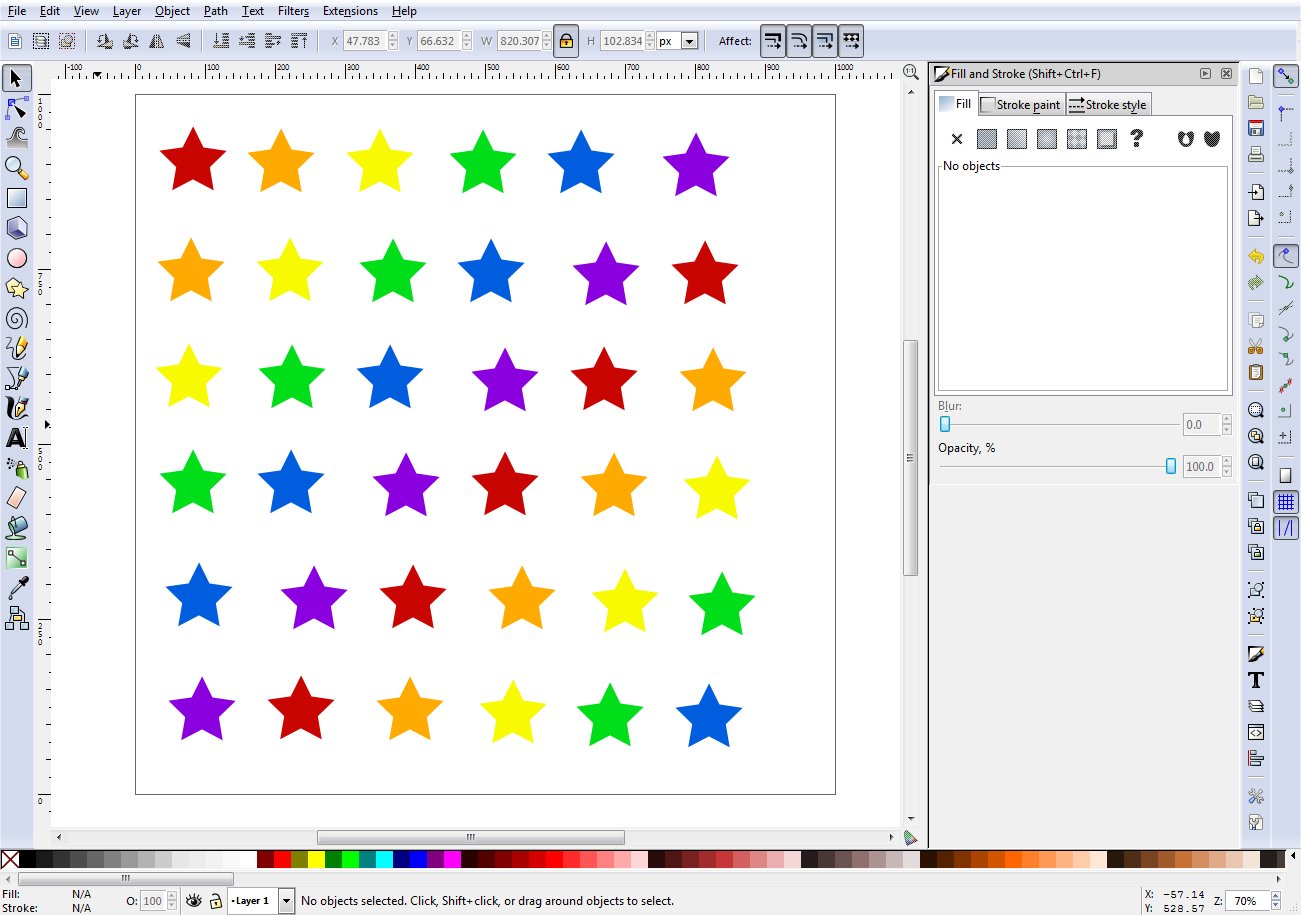
Inkscape's alignment and distribution functionality is wonderful to use for organizing graphic or typographic design elements or laying out printed matter. In this tutorial I will demonstrate this by creating a simple graphic design of colored stars.
Using the Align and Distribute Tool
Step 1 – Create a Canvas
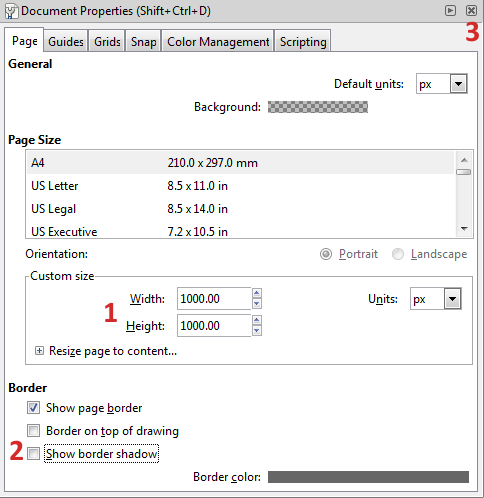
Start by invoking Inkscape, which, by default, automatically comes up with a new blank canvas. Create a 1000 x 1000 pixel page by choosing File > Document Properties (Shift+Ctrl+D) and changing the Width and Height to 1000 [1]. I also generally untick Show border shadow [2] because I find it distracting. The changes occur when you hit Tab or Enter or click on a box, so don't look for an Apply or OK button. Click the X in the upper right corner of the window [3] to dismiss it.
Step 2 – Create a Star Object
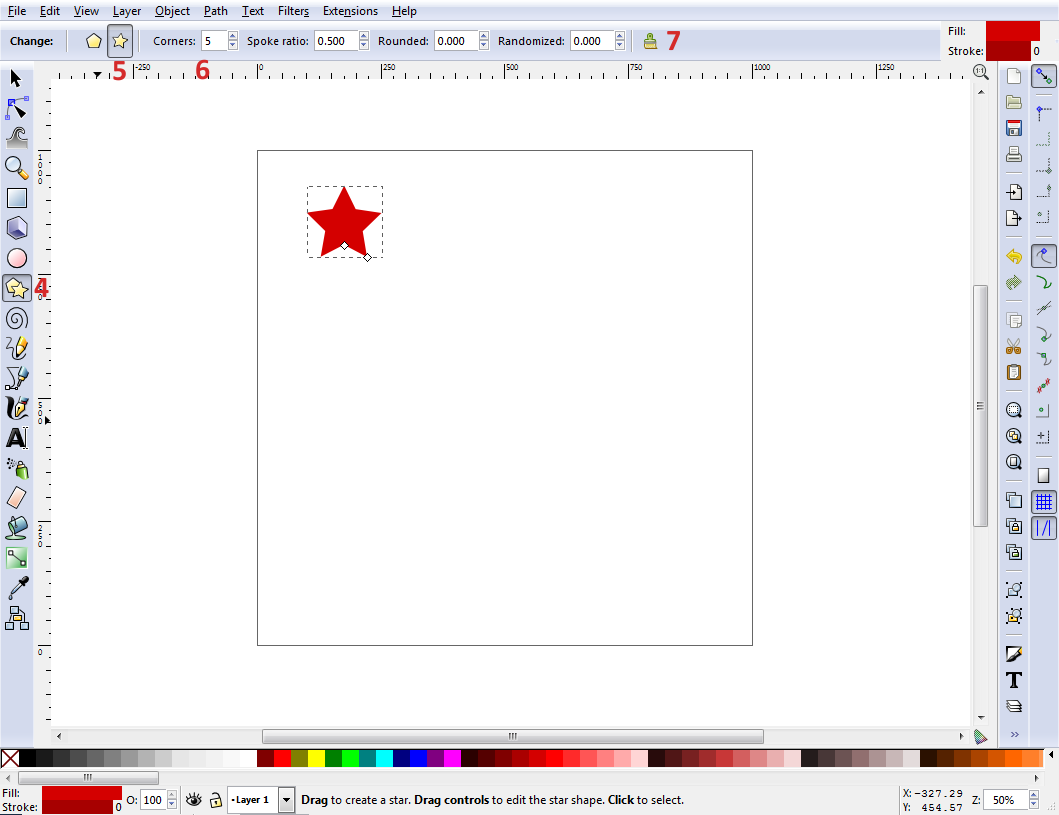
To create the first star, select the Create stars and polygons tool (*) [4], click on the star shape [5], set Corners to 5 [6], click on the brush icon [7] to reset the shape parameters to the default, and drag out a shape.
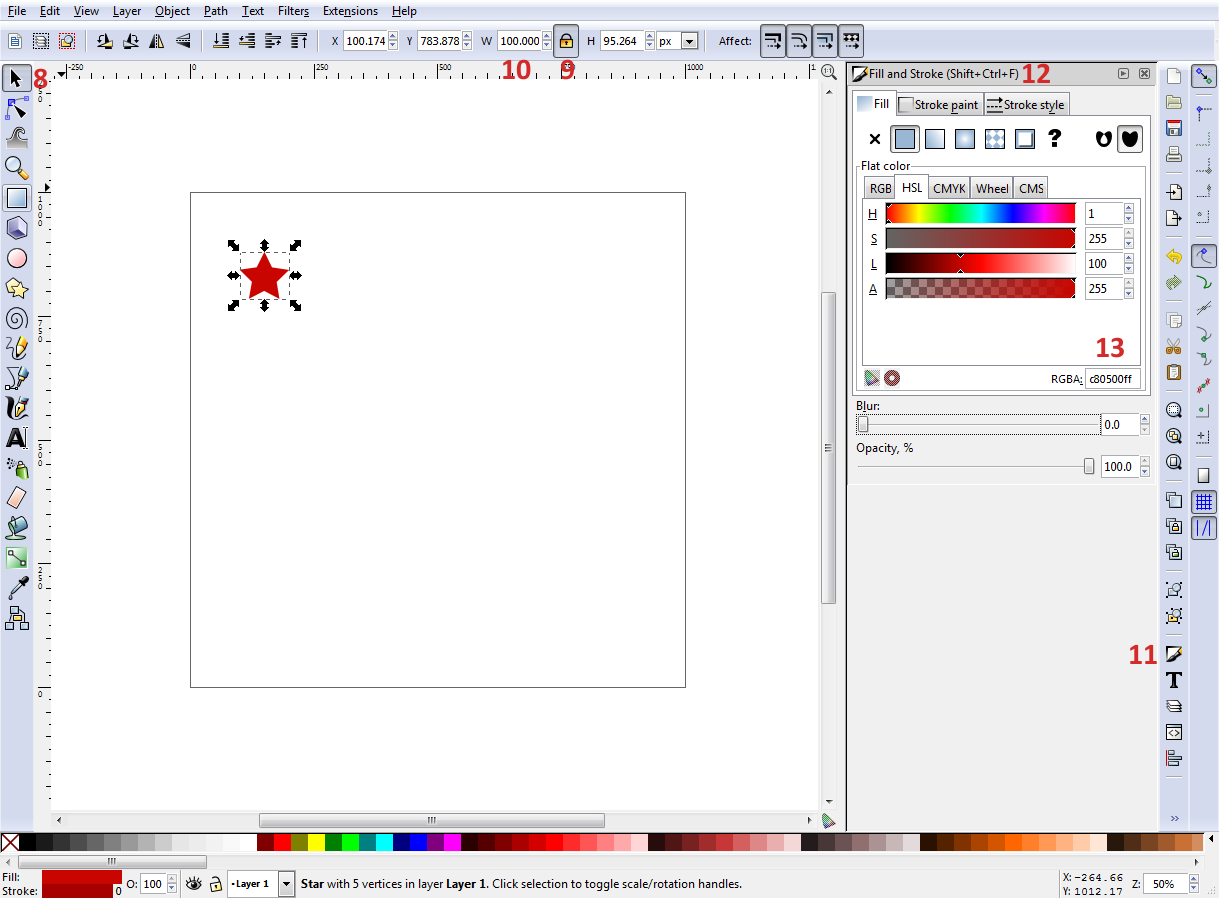
Switch to the Select and transform objects tool (F1) [8], click on the lock icon [9] to lock the width and height together, then change the width to 100 [10]. Click on the Edit objects... icon [11] (Shift+Ctrl+F) to open the Fill and Stroke dialog [12]. In the Stroke style tab, change Width to 0. In the Fill tab, set the color to a shade of red [13]. (I chose c80500ff.)
Step 3 – Create Rows of Colored Stars
With the Select and transform
objects tool still active and the red star selected, use Ctrl+D
to duplicate it. The new copy appears directly on top of the copied
object. Grab it with the mouse and move it to the right. Change its
color to orange. Duplicate the star four more times and change the
colors to yellow, green, blue, and purple, making a row of colored
stars. Left-click on the canvas above and to the left of the red star
and drag a rectangle around all of the stars to select the entire
row. Use Ctrl+D to duplicate the row, then drag the new row down.
Left-click somewhere on the canvas or hit the Esc key to remove the
selection, then grab the red star and move it to the right end of the
row. Grab all the stars on the second row and move the row to the
left to be roughly under the first row. Repeat these steps four more
times so that you have a total of six lines of stars with a
succession of colors.
Step 4 – Align and Distribute the Stars in the First Row
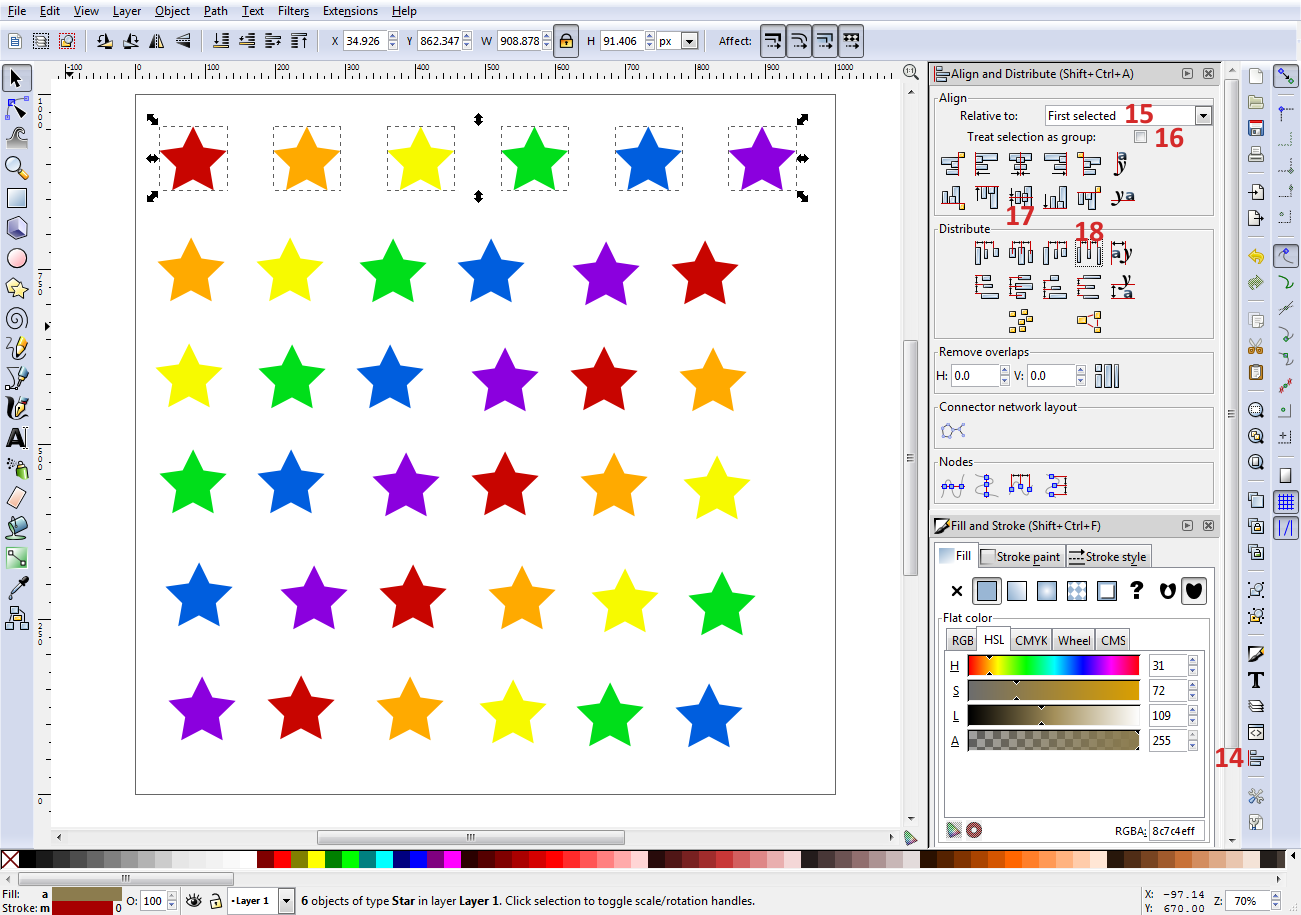
Now it's time to align and distribute
the objects. Click on the Align and distribute objects icon (Shift+Ctrl+A)
[14] to open the Align and Distribute
dialog. Let's start by adjusting the first row to a nice spacing.
Move the red star until you like its position relative to the upper
left corner of the page. Move the purple star until you like its
position relative to the upper right corner of the page. Select all
stars in the first row, make sure Relative to is set to First
Selected [15] and Treat selection as a group [16] is not
ticked, then click on the Center on horizontal axis icon [17]
in the Align section. Next, click on the Make horizontal
gaps between objects equal icon [18] in the Distribute
section. You should have a nice, evenly-spaced, aligned row of stars.
NOTE: Distribution does not move
the leftmost and rightmost, or topmost and bottommost, objects, only
the objects in between them.
Step 5 – Align All of the Stars into Rows and Columns
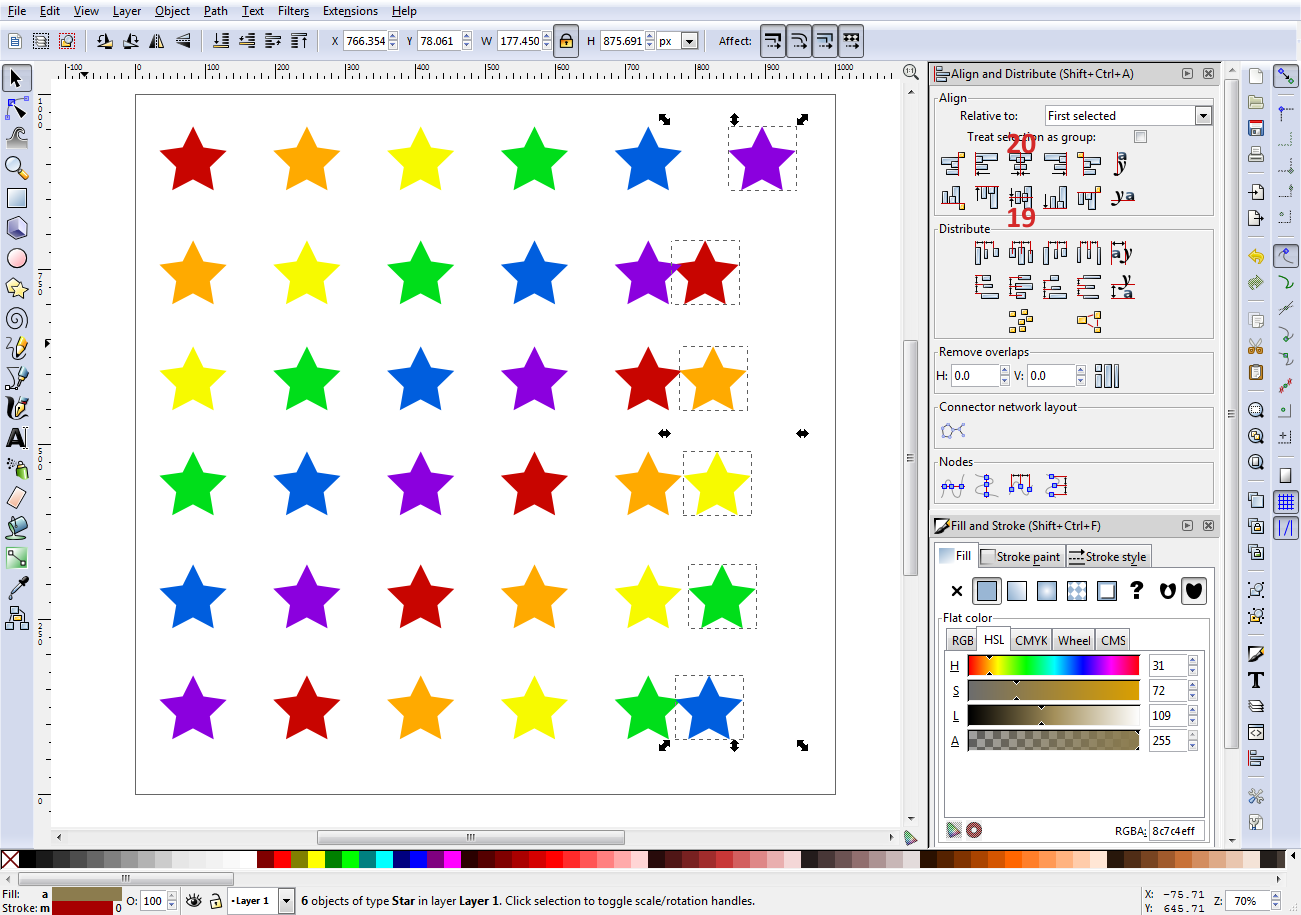
Align the stars in the rest of the rows
horizontally by selecting all stars in a row and clicking on the
Center on horizontal axis icon [19]. Then align all the stars
into vertical columns by selecting a column of stars and clicking on
the Center on vertical axis icon [20]. You can select a column
of stars either by dragging a selection box around them if they're
already in a reasonably aligned column, or by clicking on each star
in a column individually, making sure to hold the Shift key down
after you select the first star so that each star gets added to the
selection.
Step 6 – Distribute the Rows and Align the Entire Graphic
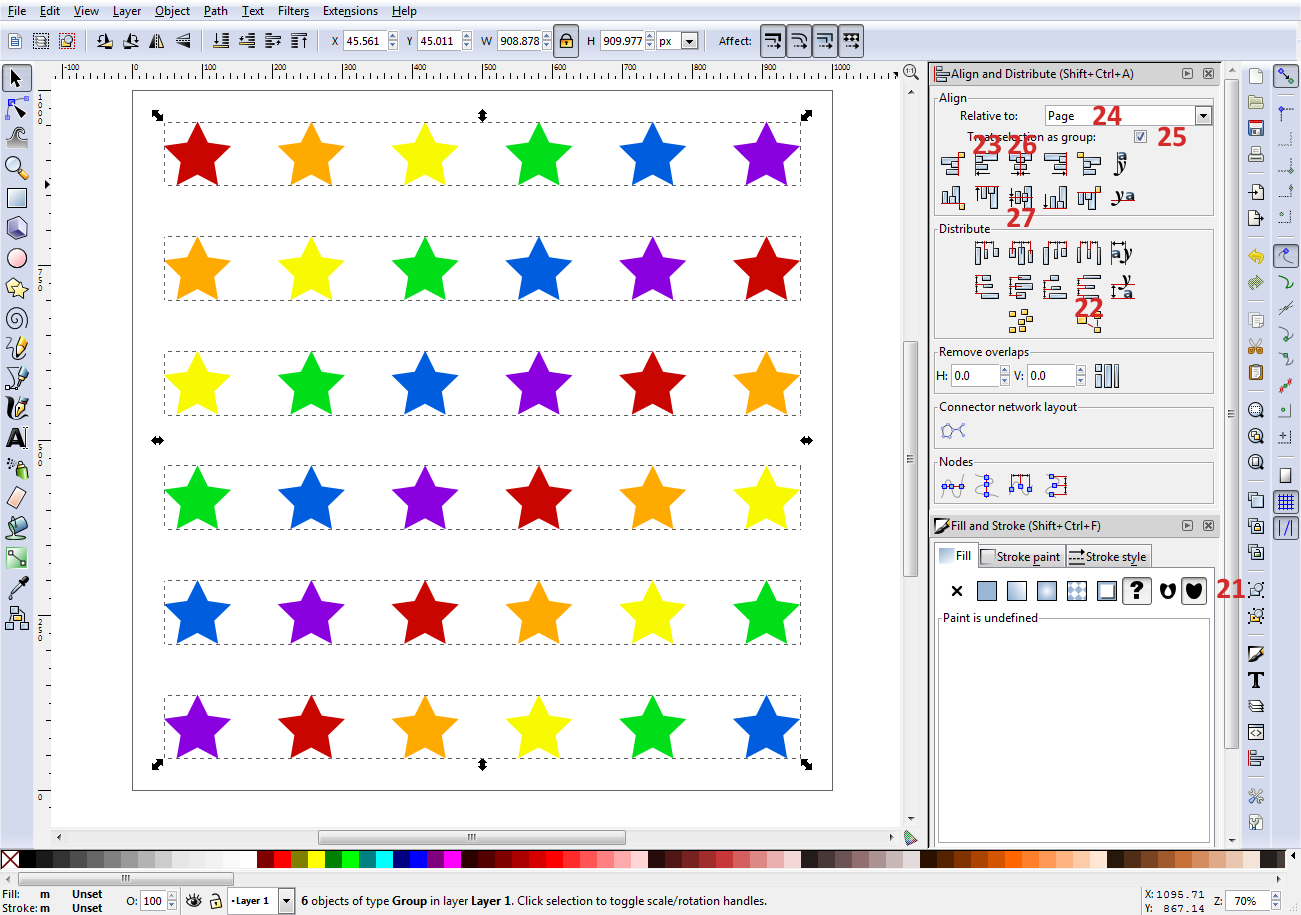
The final step is to distribute the rows so that they're evenly spaced, then center the entire graphic on
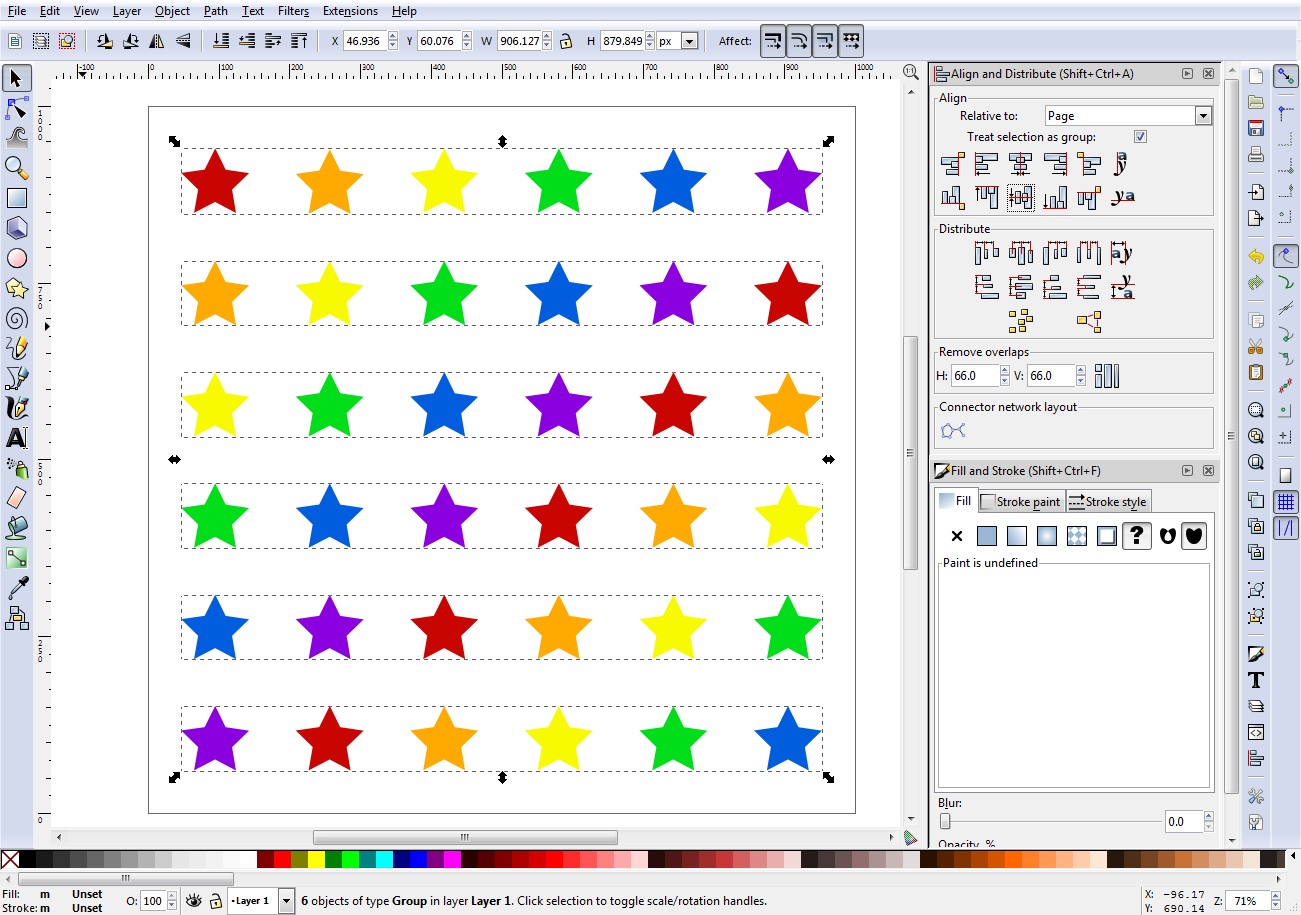
the page. The easiest way to do this is to make each row a group. Select all the stars in the first row and click on the Group selected objects icon (Ctrl+G) [21]. Do the same for the remaining five rows. Move the bottom row until you like its position relative to the bottom of the page. Select all six rows and click on
the Make vertical gaps between objects equal icon [22]. Click on the Align left edges icon [23] to make sure all the columns are still aligned since the bottom row may have gone out of alignment when you moved it. Finally, change Relative to to Page [24], tick Treat selection as a group [25], and click on both Center on vertical axis [26] and Center on horizontal axis [27]. You will now have a nicely aligned and centered grid of stars.
The only thing you don't necessarily have is the same spacing between the rows as between the columns. How
do we accomplish this? By using the Remove overlaps section of the Align and Distribute dialog, which requires that you know how many pixels you want separating two objects. If you've mapped out your design in advance, you probably have a good idea what kind of spacing you want. If, like I'm doing in this example, you're making it up as you go along, you can use the Create rectangles and squares tool to create a rectangle that you can resize to roughly the size of the space between two of the stars, then use its width value when removing overlaps.
Step 7 – Measure the Spacing
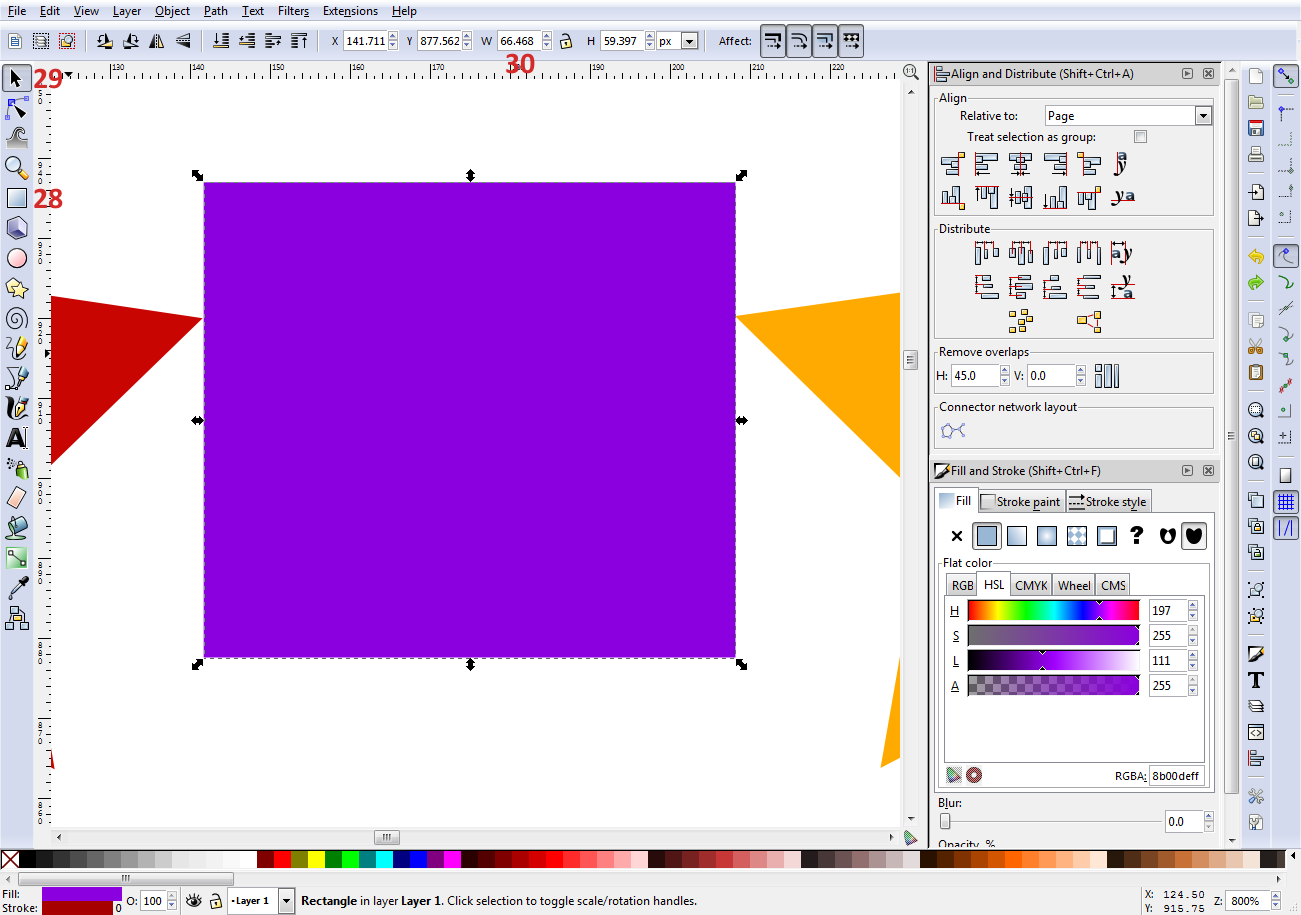
Select the Create rectangles and
squares tool (F4) [28] and draw a rectangle between two of
the stars in a row. Switch to the Select and transform objects
tool [29] and zoom in (Ctrl+Mouse wheel forward) so you can see clearly how to adjust the
width so that the rectangle is just touching the two stars. I like
non-fractional numbers, so I decided to use a width of 66 [30]. After
noting the width you want to use, hit the Delete key to delete the
rectangle, then zoom back out (Ctrl+Mouse wheel backward).
Step 8 – Reset the Spacing
Select all of the rows of stars and click on the Ungroup selected groups icon (Shift+Ctrl+G) [31] to ungroup them into individual stars. Grab each star in the first row and move them so they're all overlapping somewhat. Select them all, then enter your width value in both the H and V boxes [32] of Remove overlaps and press the Move objects as little as possible... icon to the right [33]. This will probably misalign the row with respect to the page. If so, with Relative to Page selected and Treat selection as group ticked, click on Center on vertical axis [34].
TIP: To butt two objects together so that they're exactly touching, overlap them, select them
both, then enter 0 in the H and V boxes before clicking on the Move objects as little as possible... icon.
Step 9 – Realign the Objects
Using the steps outlined above, realign the stars in all the columns with the stars in the first row. (Make
sure you set Relative to back to First selected and untick Treat selection as group.)
Regroup the stars on each row to make six row groups. Drag the five rows below the top row upward so that all rows overlap somewhat. Select all the rows and click on the Move objects as little as possible...
icon. This should make the spacing between the rows the same as the spacing between the columns. Click on Align
left edges, change Relative to to Page, tick Treat selection as group, then click on Center on vertical axis and Center on horizontal axis. Your design should now be properly spaced and centered.
Step 10 – Experiment with Aligning to Anchors
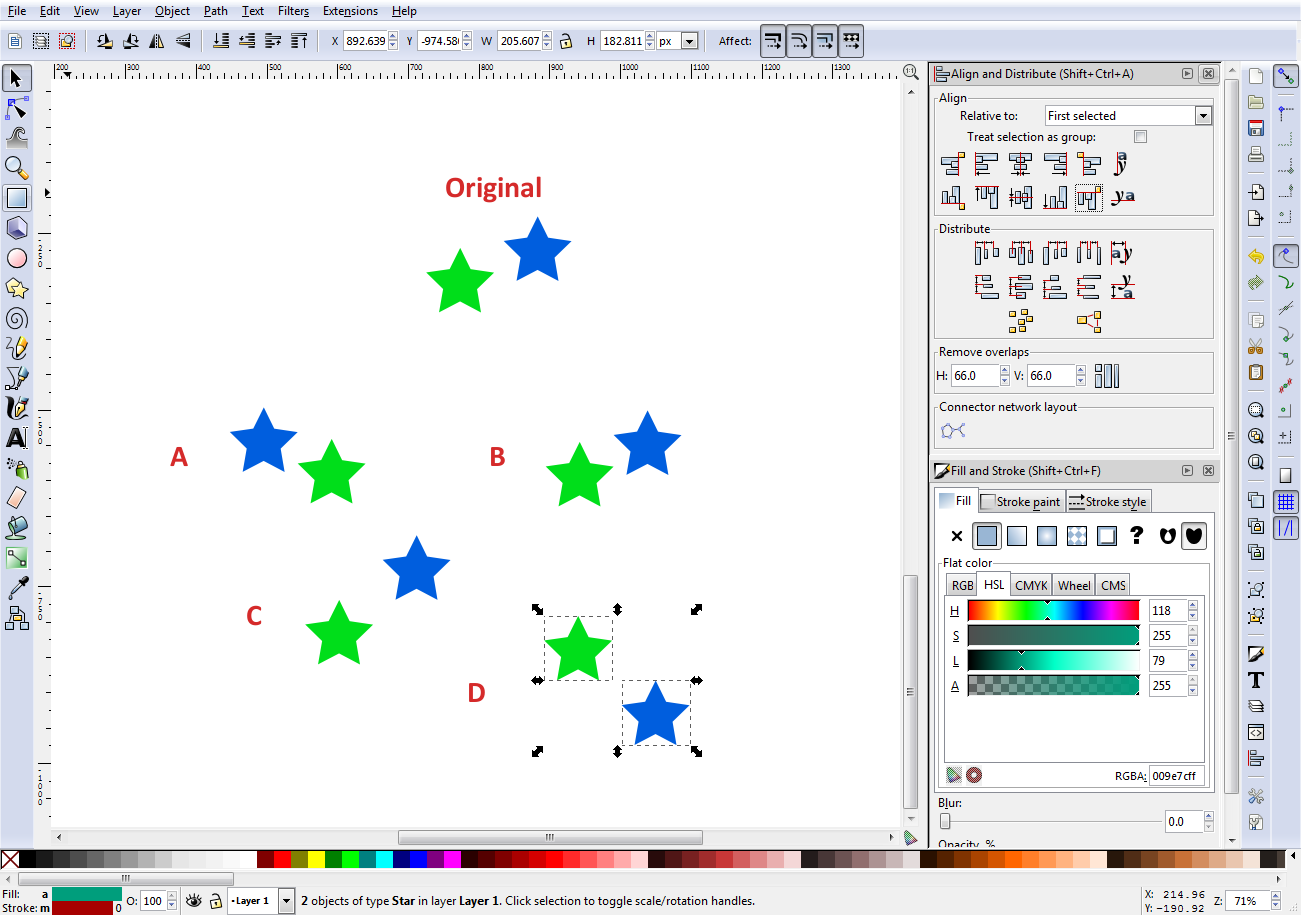
Besides the usual left, right, top, bottom, horizontal center, and vertical center alignment buttons, there are also four buttons that align objects to the anchor of a target object. To see how they work, copy two stars to, or create two new objects on another part of the canvas. Make sure Relative to is set to First
selected and Treat selection as group is not ticked. Select both objects and try each of the anchor alignment options. In my example image, the top pair of stars is in the original configuration. In each case
I chose the green star first. Pair A was created with Align right edges of objects to the left edge of the anchor; pair B with Align left edges of objects to the right edge of the anchor; pair C with Align bottom edges of objects to the top edge of the anchor; and pair D with Align top edges of objects to the bottom edge of the anchor.
NOTE: “Anchor” is another word for the edge of the bounding box around an object. This is another method that can be used to make two objects touch without overlapping.
Using the Rows and Columns Tool
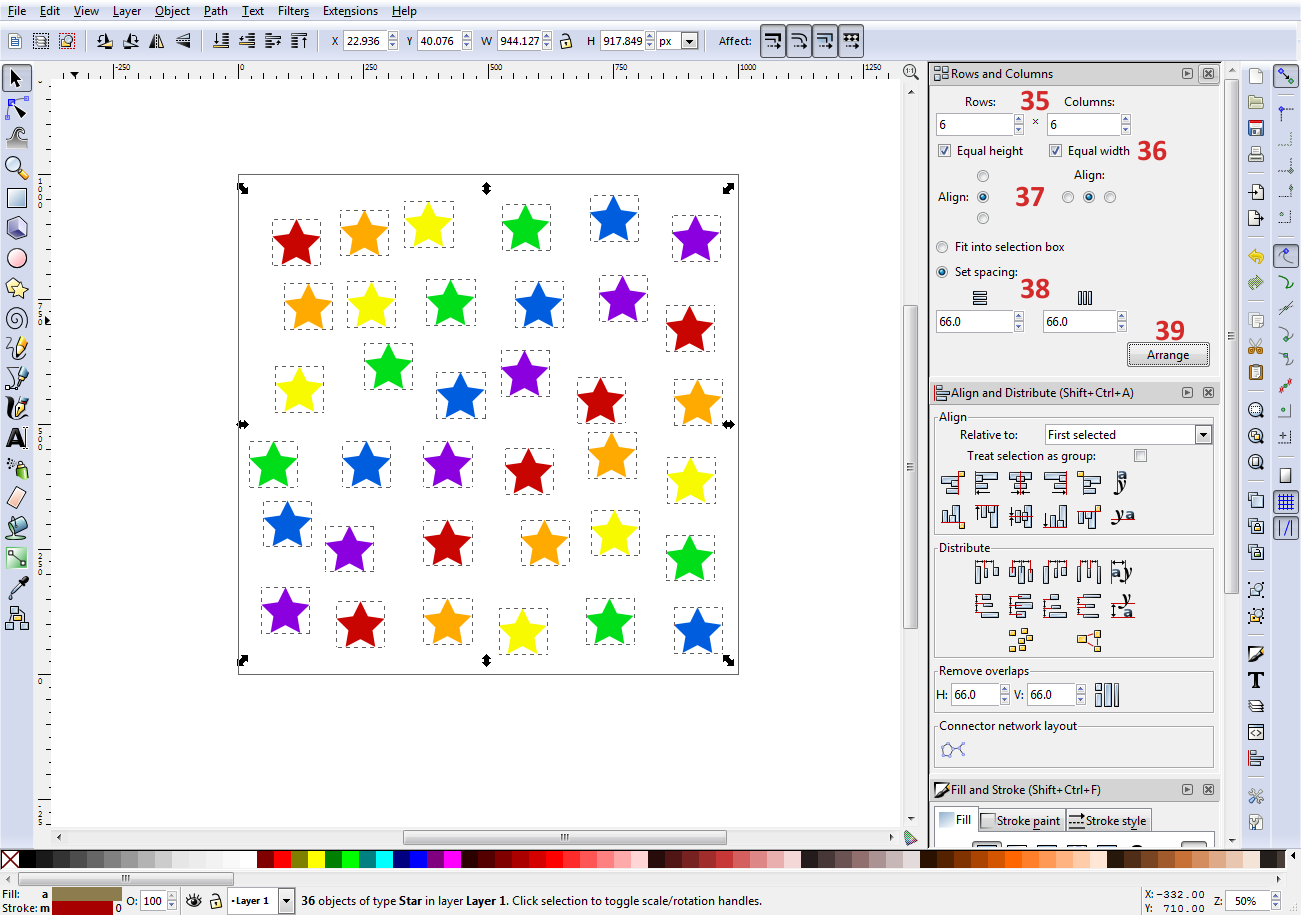
Because of its regularity, the stars design created above can also be created using the Rows and Columns tool, which is accessed via Object > Rows and Columns. This tool allows you to create tables by specifying the number of rows and columns, whether or not the height and width are equal, how to do the alignment, and how many pixels to use for spacing. Let's play with it!
Step 11 – Make a Mess, Then Clean It Up
Ungroup the stars design so that the stars are individuals again. Move them around a bit so that they're not aligned any more, but not so much that they completely move out of their columns or rows. Select them all. You should see Rows and Columns set automatically to 6 each [35]. If not, set them to 6. Make sure Equal height and Equal width [36] are ticked and that both Align options [37] are set to center. Choose Set spacing [38] and set both spacing values to the spacing you used previously, then
press the Arrange button [39].
Well, that almost worked. The stars are nicely arranged, but some of the colors were moved to the wrong locations. Grab each star that's out of place and move it to approximately the correct location. Select all
the stars and press the Arrange button again. This time they stayed in their places (at least, for
me); however, the entire design is off-center from the page. Use the Align and Distribute tool to re-center the design on the page. Well, that was quite a bit easier than the process outlined in the previous section!
Conclusion
As you've seen, Inkscape's alignment, distribution, and table creation tools are quite powerful and relatively easy to use. They should eliminate much of the frustration you might experience when trying to organize your graphic elements. Spend some time playing with the various features to make sure you have a good feel for how they work.
I've touched on only the
aspects of the Align and Distribute tool that I find to be the most
useful. As you can see, there is additional functionality related to
aligning and distributing text, distributing based on various aspects
and relationships of objects, creating random layouts of objects,
aligning nodes, and arranging connector networks (having to do with
technical drawings). Most of these functions are pretty obvious or can
be determined easily through experimentation. If you need more help, I
highly recommend The Book of Inkscape: The Definitive Guide to the Free Graphics Editor by Dmitry Kirsanov.
See Also
Alignment and Distribution of Graphic Elements in GIMP



No comments:
Post a Comment